Alas, the initial success I had with the finger joints has not been repeated. Because of the way the jig works, any slight discrepancy in the width of the fingers (since the gaps' width is predetermined by the kerf of the saw blade) gets magnified over the piece until you get a piece that simple cannot fit into any other piece. I spent at least an hour just trying to nudge the jig against the fence, moving it by fractions of a millimeter before running another 1x2 through it to see how it fared. Unfortunately, I never did get it just right. I'm not sure what I need to do to get it perfect again, but I need to figure something out. I'll keep you guys posted.
I'm also planning to shorten my walking stick by maybe 6", though I'm now debating whether to go with a smaller ball. The big 3" sphere looks kinda cool, actually. I'm still not entirely sure how I want to attach it to the rest of the stick structure, though. Glues and epoxies are generally so messy. I'd like a mechanical attachment but I'm not sure what would work. I'll think of something, I'm sure.
Tuesday, August 25, 2009

Thursday, August 20, 2009
Making progress in several ways
Hey guys! I didn't actually take pictures of me doing things, because I'm really bad at remembering to do that, but I did take some pictures of a few test projects and whatnot. Here's what I've come up with:
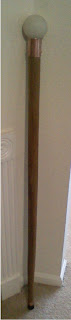
This is my walking stick. So far, all I've done is to get it from a square piece of stock to a round piece of stock with some very minor tapering. I'm going to fix up the tapering and maybe shorten it a little. Right now it's over 4' long, which is a bit much for a walking stick, even for a man of my stature. You'll notice the copper pieces at the top and bottom, hopefully. Those will be staying the same, though I'm thinking about getting a different one for the top. Something with a stop in it would be helpful, I think. We'll see what I do. The ball on top is actually a 3" sphere (used for contact juggling) so it's bigger than the finished sphere will be. The finished sphere will also be clear and lit from the bottom.

This is what I've managed to do with my finger jig. You'll notice that the pins get shorter and shorter on both pieces as they go. I'm going to fix that up with a little bit of a tweak to the jig. Still, I'm amazed at how much easier these were to make than the ones using my router. the fingers are much thinner, but also much more uniform and much much faster to cut. I actually prefer the very thin fingers, especially on a piece this small.

Here's a picture of the fingers fitting together. They did so pretty darned well, really. The joints are very snug, which is exactly what you want in the situation. With a little glue in there, I think they'll be very strong and look quite good.
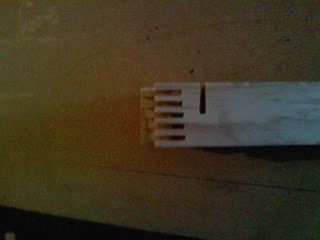
Here's the same joint at an angle.
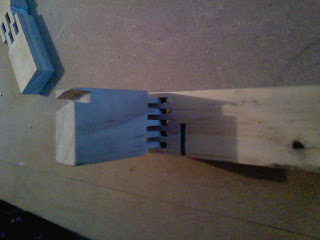
Same joint at a different angle. You can see how these joints are very versatile and could be used to make joints of almost any angle. I'm wondering about the possibility of making a hexagonal or octagonal box using these joints. We'll see how far I get.

Last picture of this joint. This is just a test scrap, but I'm extremely pleased with the results. It was so fast and easy to do this piece, I think I may be able to start making boxes like this more often.
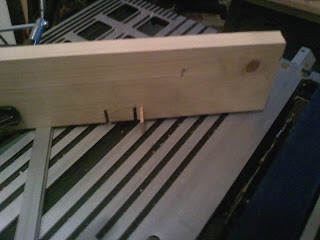
Here's my jig. pay no attention to the slot on the left. it was an error due to the saw blade being very very slightly off square. The slot and pin on the right are the way this jig works. The slot is where the saw blade (lower right) goes. It's almost exactly 1/8" wide, as is the pin. To start, you take the wood and butt it up against the pin, then clamp it and run it through the saw. Then take the gap you just made in the work piece and drop it onto the pin. Run the piece through the saw again. See? You're making perfectly spaced pins and slots that will fit into each other quite nicely.

Another angle on the jig. You can see the c-clamp and miter gauge better in this one.
So there you have it. I'll try to keep you all informed of my progress as I make it.

This is my walking stick. So far, all I've done is to get it from a square piece of stock to a round piece of stock with some very minor tapering. I'm going to fix up the tapering and maybe shorten it a little. Right now it's over 4' long, which is a bit much for a walking stick, even for a man of my stature. You'll notice the copper pieces at the top and bottom, hopefully. Those will be staying the same, though I'm thinking about getting a different one for the top. Something with a stop in it would be helpful, I think. We'll see what I do. The ball on top is actually a 3" sphere (used for contact juggling) so it's bigger than the finished sphere will be. The finished sphere will also be clear and lit from the bottom.

This is what I've managed to do with my finger jig. You'll notice that the pins get shorter and shorter on both pieces as they go. I'm going to fix that up with a little bit of a tweak to the jig. Still, I'm amazed at how much easier these were to make than the ones using my router. the fingers are much thinner, but also much more uniform and much much faster to cut. I actually prefer the very thin fingers, especially on a piece this small.

Here's a picture of the fingers fitting together. They did so pretty darned well, really. The joints are very snug, which is exactly what you want in the situation. With a little glue in there, I think they'll be very strong and look quite good.

Here's the same joint at an angle.

Same joint at a different angle. You can see how these joints are very versatile and could be used to make joints of almost any angle. I'm wondering about the possibility of making a hexagonal or octagonal box using these joints. We'll see how far I get.

Last picture of this joint. This is just a test scrap, but I'm extremely pleased with the results. It was so fast and easy to do this piece, I think I may be able to start making boxes like this more often.

Here's my jig. pay no attention to the slot on the left. it was an error due to the saw blade being very very slightly off square. The slot and pin on the right are the way this jig works. The slot is where the saw blade (lower right) goes. It's almost exactly 1/8" wide, as is the pin. To start, you take the wood and butt it up against the pin, then clamp it and run it through the saw. Then take the gap you just made in the work piece and drop it onto the pin. Run the piece through the saw again. See? You're making perfectly spaced pins and slots that will fit into each other quite nicely.

Another angle on the jig. You can see the c-clamp and miter gauge better in this one.
So there you have it. I'll try to keep you all informed of my progress as I make it.
Monday, August 17, 2009
Another new project
Here's the other thing I'm working on now:
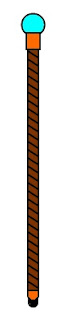
It's a walking stick, carved from western cedar, capped on top and bottom with copper bands, with a glowing glass globe as the grip. It's taking a heck of a lot of work, but I think it'll turn out very well. it started as a rough-cut 2"x4"x8' piece of cedar, ripped and cut to 1.5"x1.5"x4' and then painstakingly rounded down with a drawknife and rasp. Next, I need to taper it from a 1.5" diameter at the top to a 1" diameter at the bottom, then go to work carving the grooves to make the spiral shape. Then I'm going to drill down into the top to make a place to put a battery and an LED. I'll have to drill out a place for a switch as well, so I can turn the light on and off.
I'm still not sure what I'll use for the globe. Glass is super heavy unless it's hollow, and if it's hollow it's generally fragile. I may have to look into something else. I'm going to try a few different sizes for the orb on top and see what I like. I'm thinking I may end up getting a clear acrylic ball for contact juggling, but in a smaller size. I'll keep you informed.

It's a walking stick, carved from western cedar, capped on top and bottom with copper bands, with a glowing glass globe as the grip. It's taking a heck of a lot of work, but I think it'll turn out very well. it started as a rough-cut 2"x4"x8' piece of cedar, ripped and cut to 1.5"x1.5"x4' and then painstakingly rounded down with a drawknife and rasp. Next, I need to taper it from a 1.5" diameter at the top to a 1" diameter at the bottom, then go to work carving the grooves to make the spiral shape. Then I'm going to drill down into the top to make a place to put a battery and an LED. I'll have to drill out a place for a switch as well, so I can turn the light on and off.
I'm still not sure what I'll use for the globe. Glass is super heavy unless it's hollow, and if it's hollow it's generally fragile. I may have to look into something else. I'm going to try a few different sizes for the orb on top and see what I like. I'm thinking I may end up getting a clear acrylic ball for contact juggling, but in a smaller size. I'll keep you informed.
Monday, August 10, 2009
New Projects
Hey guys! Okay, here are some new things I'm working on now. These are just a couple little accessories we were thinking about making for Halloween costumes. So you can understand them, blue is glass, brown is wood and yellow is brass. I'll see if I can remember to post pictures of these while they're in progress as well.
This is a wooden bottle rack. Four small glass bottles filled with various mysterious substances will be held in this wood and brass rack.

This is a larger specimen container. It's glass surrounded by a wooden frame and a brass cage. Inside is a mysterious liquid that protects and contains a rare and bizarre specimen obtained from the darkest corners of the Amazon rain forest.
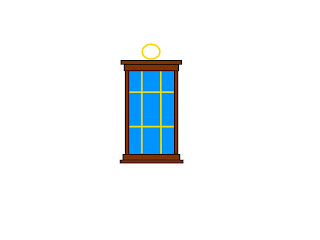
This is a wooden bottle rack. Four small glass bottles filled with various mysterious substances will be held in this wood and brass rack.

This is a larger specimen container. It's glass surrounded by a wooden frame and a brass cage. Inside is a mysterious liquid that protects and contains a rare and bizarre specimen obtained from the darkest corners of the Amazon rain forest.

Monday, August 3, 2009
Preparations
Hey guys! I've been super busy and haven't really been making much of anything, but I'm working on getting myself ready to make a few things. First, I'm trying to make a finger-joint jig. This will allow me to make various wooden structures using finger joints. Should be cool. Second, I'm making some props and accessories for Halloween costumes. Those should be very neat. Lastly, I'm looking to make a fiberglass composite recurve bow, and I'm trying to put together all the various things I need for that.
So, if you've been wondering where I've been and what I've been doing, fear not. I'm still doing things, I've just been a bit of a slacker in posting about them.
Here, for your enjoyment, is a diagram of a Flemish string jig, used for making bowstrings. (Click for a bigger picture)
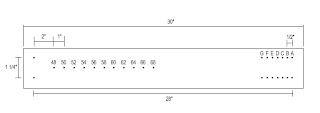
Constructing this jig requires a 30" piece of 2x4 and a bunch of finishing nails. Measuring and marking implements would also be helpful. Really, you just measure and mark out all the dots from the diagram onto your 2x4 and then hammer nails into each dot. It's incredibly easy and the jig is extremely versatile. You can use it to make strings of many different lengths and strengths, based on which pins you use and how many wraps you do.
Making a bowstring with this jig is really easy. You just take some bowstring material (Available Here) and tie it to the top "A" pin on the right side of the jig. Then you wrap it clockwise around to the bottom left pin, then up and around the center pin for the appropriate length for your bow (Length of the bow measured nock-to-nock). Continue back to the left and around the top left pin, then back up and around the "B" set of pins. Continue doing this until you've gone around all sets on the right, then Simply cut the strings right down the middle between the top and bottom pins on the right side of the jig. This will give your string a tapered effect which will help to keep it from being too bulky when you make your loops.
I'll go into how to make the strings in another entry. I may even include some pictures! I'm such a slacker when it comes to taking pictures while I'm making anything.
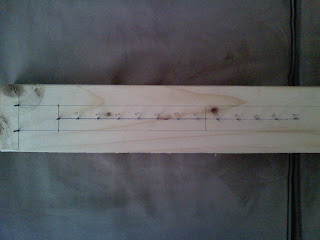
If you're interested, here are some pictures of the jig I made. As you can see, it's very simple. It's really just a tool used to make other things, so it doesn't have to be fancy. Total cost for this bad boy was...nothing for me, since I have rulers, pencils, nails and lumber laying around my house. Even if you didn't, if you had to spend more than $5 for this thing, you're doing it wrong.
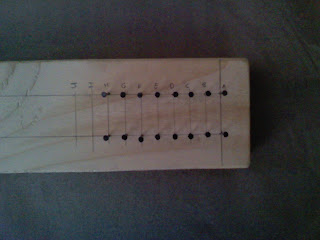
You'll notice I cut the heads off my nails on the left but not the right. Really, you don't need to cut the heads off if you don't want to. They don't really do you any good, but they don't hurt anything either. If I had it to do over, i'd use finishing nails without heads and call it good.

Many, many thanks to Sam for his articles and build-alongs that have inspired and instructed me in all my bow-making efforts. His blog is here: Sam's Blog
So, if you've been wondering where I've been and what I've been doing, fear not. I'm still doing things, I've just been a bit of a slacker in posting about them.
Here, for your enjoyment, is a diagram of a Flemish string jig, used for making bowstrings. (Click for a bigger picture)

Constructing this jig requires a 30" piece of 2x4 and a bunch of finishing nails. Measuring and marking implements would also be helpful. Really, you just measure and mark out all the dots from the diagram onto your 2x4 and then hammer nails into each dot. It's incredibly easy and the jig is extremely versatile. You can use it to make strings of many different lengths and strengths, based on which pins you use and how many wraps you do.
Making a bowstring with this jig is really easy. You just take some bowstring material (Available Here) and tie it to the top "A" pin on the right side of the jig. Then you wrap it clockwise around to the bottom left pin, then up and around the center pin for the appropriate length for your bow (Length of the bow measured nock-to-nock). Continue back to the left and around the top left pin, then back up and around the "B" set of pins. Continue doing this until you've gone around all sets on the right, then Simply cut the strings right down the middle between the top and bottom pins on the right side of the jig. This will give your string a tapered effect which will help to keep it from being too bulky when you make your loops.
I'll go into how to make the strings in another entry. I may even include some pictures! I'm such a slacker when it comes to taking pictures while I'm making anything.
If you're interested, here are some pictures of the jig I made. As you can see, it's very simple. It's really just a tool used to make other things, so it doesn't have to be fancy. Total cost for this bad boy was...nothing for me, since I have rulers, pencils, nails and lumber laying around my house. Even if you didn't, if you had to spend more than $5 for this thing, you're doing it wrong.

You'll notice I cut the heads off my nails on the left but not the right. Really, you don't need to cut the heads off if you don't want to. They don't really do you any good, but they don't hurt anything either. If I had it to do over, i'd use finishing nails without heads and call it good.


Many, many thanks to Sam for his articles and build-alongs that have inspired and instructed me in all my bow-making efforts. His blog is here: Sam's Blog
Thursday, May 14, 2009
Felting things
Hey guys! It's been a while since I posted here, mainly because life has been too busy for me to take on any new projects. Since that's the case, I'll go back to the last few skills I learned and explain them as best I can.
One of my favorite skills I picked up recently is felting 3-dimensional dolls. It's really cool and they're very unique when you're done. It's very simple, and it's something you can do without paying too much attention for most of the work. Why is it geeky? Because my next project is to make this guy:

He's a character from "Avatar: The Last Airbender" which is a fantastic show. I thought I'd make him just to see if I can do a custom piece without any instructions from a book.
The things you'll need for felting are the following: Some wool. You can get various colors of wool at a good-sized hobby store. Most hobby stores I've seen will actually have a small section devoted to felting. You can also find needles here. Felting needles are sort of uniquely shaped. They're very sharp, but the shaft of the needle is barbed, to grab fibers and push them down between one another. You'll get a pack of probably 5 of them all together. You'll also need some foam. I like a 1-2" thick piece of pretty dense stuff. This is your backstop, essentially. You'll be poking through the wool and into this foam about a billion times, so get something vaguely sturdy and at least 6" x 6" so you can work on larger pieces. If you want to make something with legs, you'll also need some piping cord. You can get this at a good-sized fabric store for super cheap. I got some 1/8" stuff for like $.10/yd or something silly. This is the body of the legs you'll be making, and will help keep them stiff enough for your little beastie to stand up.
That's really it. Pretty simple process, really. The only real danger is poking yourself, and as long as you are aware that it will happen at some point, it really isn't that traumatic. Just be careful and try to keep your fingers out of the way. The other danger is "over-felting" I guess you could call it. Basically, if you're working a piece of wool and you spend too much time in one area, you could get that part too dense and out of alignment with the rest of the space around it and get kind of a wonky shape. When you're first learning, be sure to go slowly, pick up your piece often and look at it from different angles to make sure all the curves and lines are where you want them and all. The other thing to note is that this is a very slow process. It's great fun for working in front of the TV or something, but it takes a long time. Don't expect to get a piece of felt in the size shape and density you want in any reasonable amount of time. To make something sturdy enough to stand up and survive over the years, you're going to need a lot more wool than you think, and you're going to need to felt it more than you think. Practice a bit with some basic shapes (sausage shape, ball, tube, etc.) to get a feel for how much you have to stab, how deep the needle should go, what angle it should be going in, etc.
This is a very simple craft to do, but you can make some really neat stuff with it. I suggest starting out with something simple, and working slowly and methodically until you start to feel comfortable with it.
The actual "how-to" portion of this entry is going to be a bit anti-climactic, I'm afraid. Here it is: You take a wad of wool and stab it a bunch of times with a needle. Honestly, that is the entirety of this art. The art itself comes in with shaping, design, use of color, smooth attachment of various pieces, etc. Honestly, if you go get a hank of wool from the store and just stab the crap out of it a bunch of times, you'll start to see how simple the process is. The barbs on the needle push and pull various fibers up and down through each other, melding layers of fiber with each other, increasing density and allowing for some surprisingly subtle shaping.
My source for this info and the reason I even know about the activity at all is this book: Little Felted Animals. If you can find a copy at your local library, give it a go. It has some more details about particular shapes, and even has patterns and ideas for various different animals you can make. Keep in mind that animals aren't the only thing you can make. Essentially, you could model any reasonable 3-D object with this method and a little ingenuity.
Happy felting!
One of my favorite skills I picked up recently is felting 3-dimensional dolls. It's really cool and they're very unique when you're done. It's very simple, and it's something you can do without paying too much attention for most of the work. Why is it geeky? Because my next project is to make this guy:

He's a character from "Avatar: The Last Airbender" which is a fantastic show. I thought I'd make him just to see if I can do a custom piece without any instructions from a book.
The things you'll need for felting are the following: Some wool. You can get various colors of wool at a good-sized hobby store. Most hobby stores I've seen will actually have a small section devoted to felting. You can also find needles here. Felting needles are sort of uniquely shaped. They're very sharp, but the shaft of the needle is barbed, to grab fibers and push them down between one another. You'll get a pack of probably 5 of them all together. You'll also need some foam. I like a 1-2" thick piece of pretty dense stuff. This is your backstop, essentially. You'll be poking through the wool and into this foam about a billion times, so get something vaguely sturdy and at least 6" x 6" so you can work on larger pieces. If you want to make something with legs, you'll also need some piping cord. You can get this at a good-sized fabric store for super cheap. I got some 1/8" stuff for like $.10/yd or something silly. This is the body of the legs you'll be making, and will help keep them stiff enough for your little beastie to stand up.
That's really it. Pretty simple process, really. The only real danger is poking yourself, and as long as you are aware that it will happen at some point, it really isn't that traumatic. Just be careful and try to keep your fingers out of the way. The other danger is "over-felting" I guess you could call it. Basically, if you're working a piece of wool and you spend too much time in one area, you could get that part too dense and out of alignment with the rest of the space around it and get kind of a wonky shape. When you're first learning, be sure to go slowly, pick up your piece often and look at it from different angles to make sure all the curves and lines are where you want them and all. The other thing to note is that this is a very slow process. It's great fun for working in front of the TV or something, but it takes a long time. Don't expect to get a piece of felt in the size shape and density you want in any reasonable amount of time. To make something sturdy enough to stand up and survive over the years, you're going to need a lot more wool than you think, and you're going to need to felt it more than you think. Practice a bit with some basic shapes (sausage shape, ball, tube, etc.) to get a feel for how much you have to stab, how deep the needle should go, what angle it should be going in, etc.
This is a very simple craft to do, but you can make some really neat stuff with it. I suggest starting out with something simple, and working slowly and methodically until you start to feel comfortable with it.
The actual "how-to" portion of this entry is going to be a bit anti-climactic, I'm afraid. Here it is: You take a wad of wool and stab it a bunch of times with a needle. Honestly, that is the entirety of this art. The art itself comes in with shaping, design, use of color, smooth attachment of various pieces, etc. Honestly, if you go get a hank of wool from the store and just stab the crap out of it a bunch of times, you'll start to see how simple the process is. The barbs on the needle push and pull various fibers up and down through each other, melding layers of fiber with each other, increasing density and allowing for some surprisingly subtle shaping.
My source for this info and the reason I even know about the activity at all is this book: Little Felted Animals. If you can find a copy at your local library, give it a go. It has some more details about particular shapes, and even has patterns and ideas for various different animals you can make. Keep in mind that animals aren't the only thing you can make. Essentially, you could model any reasonable 3-D object with this method and a little ingenuity.
Happy felting!
Monday, May 4, 2009
More tests, more happy
Yesterday, I tried the sling in the test chamber again, but this time with a racquetball, a 1.25-inch diameter super ball and a lacrosse ball. As the ammunition gets heavier, the speed at which it is thrown gets faster. The lacrosse ball was by far the heaviest, and when I threw it from as far back in the court as I could, it bounced off the front wall and got back to me still going fast enough to hurt my hand. I'm not trying to throw anything with extra force, I'm just letting the sling do the work, and the increased weight is increasing the rotational velocity of the sling and thus the release velocity of the ball.
I still haven't gotten to head out to an open field to see how far I can throw something, but I'm hoping to do that soon. I also really want to throw at a target, to see how accurate I am. I'm thinking of taping out a small square in the racquetball court next time I got down, and trying to work on hitting it consistently.
I still haven't gotten to head out to an open field to see how far I can throw something, but I'm hoping to do that soon. I also really want to throw at a target, to see how accurate I am. I'm thinking of taping out a small square in the racquetball court next time I got down, and trying to work on hitting it consistently.
Subscribe to:
Posts (Atom)